Induction Forge Operation
General Information
This page covers the setup, operation, shutdown, and maintenance procedures for the Coal Iron Works 15 kW Induction Forge. For an overview of all forges, see Gas and Induction Forge.
The induction forge uses electromagnetic fields to heat electrically conductive metal rapidly. It is useful for forging, heat treating, bending, upsetting, localized heating, and heating specific sections of a workpiece without bringing an entire gas forge up to temperature.
The induction forge heats metal much faster than a gas forge and is the recommended tool for many small-to-medium forging operations. It has fast setup, fast cooldown, and no open flame. It is not a replacement for every gas forge operation: the workpiece must fit the coil, the heating zone is localized, and coil selection matters.
- Coal Iron Works 15 kW Induction Forge
-
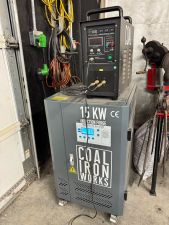 The induction forge on its rolling cart (power supply, control panel, coil, and chiller)

For a visual introduction to the Coal Iron Works induction forge system, watch the video below:
Note: The video demonstrates a closely related Coal Iron Works induction forge system. Use this page and the posted shop instructions as the authority for our 15 kW machine.
Machine Information
Our machine is the Coal Iron Works 15 kW Induction Forge.
- Use only on the approved dedicated circuit.
- Do not modify plugs, wiring, breakers, extension leads, or electrical connections.
- Do not use extension cords or undersized wiring.
- Do not run other high-draw equipment on the same circuit unless approved by Makerspace leadership.
- If the machine trips a breaker, alarms, or performs poorly, stop and contact Makerspace leadership.
Safety
- Use only after shop authorization or training.
- Always wear appropriate PPE:
- Safety glasses or face shield
- Heat-resistant gloves when handling hot stock
- Closed-toe leather shoes or boots
- Natural-fiber clothing (cotton, wool, or leather)
- Hearing protection if other shop equipment is running
- Do not wear synthetic clothing near hot metal. Synthetic fabrics can melt.
- Remove watches, rings, bracelets, necklaces, keys, and other metal items before working near the coil.
- Keep phones, magnetic cards, electronics, and loose metal objects away from the coil area.
- Use tongs or appropriate tooling. Never hold short workpieces by hand.
- Never touch the workpiece during or immediately after heating.
- Never touch the coil during operation.
- Do not allow the workpiece to contact the copper coil.
- Keep the work area clear of flammable materials.
- Do not operate the forge if water lines, electrical cables, the coil, fittings, or controls appear damaged.
- Do not operate the forge if there is water leaking anywhere on the machine or cart.
- Keep bystanders outside the immediate work area while heating.
- People with pacemakers, implanted medical devices, or other magnetically sensitive medical equipment should not operate or stand close to the induction forge.
Setup
The induction forge is located on a rolling cart in the Metal Shop. The system includes:
- Power supply / induction heater
- Control panel
- Manual and automatic operating modes
- Amperage or power adjustment control
- Start/stop controls
- Foot pedal
- Interchangeable induction coil
- Integrated industrial chiller
- Water reservoir and coolant lines
- Induction Forge Components
-
 Control panel (power switch, amperage knob, start/stop, mode selector)
 -
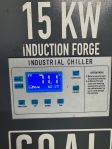 Integrated chiller and water cooling system (check water level here)
 -
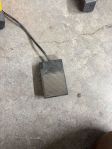 Foot pedal for manual mode (press to heat, release to stop)


Electrical Setup
- Verify that the machine is plugged into the approved outlet before use.
- Do not use extension cords or undersized wiring.
- Do not modify the plug or electrical connection.
- Do not share the circuit with other high-draw equipment unless approved by Makerspace leadership.
- If the machine trips a breaker, stops unexpectedly, or performs poorly, stop and contact Makerspace leadership.
Cooling and Chiller System
The induction forge must have active water cooling before operation. The cooling system circulates water through the induction coil and internal components.
The Coal Iron Works system uses an integrated industrial chiller. The chiller includes a refrigeration unit that monitors and maintains water temperature as heat is absorbed from the work coil. This supports continuous operation when the machine is set up correctly.
- Verify that the reservoir has adequate water before use.
- Use only the water or coolant specified by shop procedure.
- Confirm that the chiller/pump is running before enabling the forge.
- Confirm water is circulating through the coil.
- Check for leaks before applying power.
- Do not run the forge dry. Running without cooling can damage the coil and internal electronics quickly.
- Allow the chiller to continue running during cooldown after heating stops.
Chiller Temperature and Condensation
- If the chiller temperature is set too low, condensation can form on the machine, coil, or water lines.
- Condensation is more likely when the water temperature is below the local dew point.
- If sweating or condensation appears on the equipment, stop and contact Makerspace leadership.
- Only trained personnel should adjust the chiller set point.
Coil Selection and Configuration
The induction coil is part of the heating circuit, not just a holder for the workpiece. Coil choice strongly affects performance.
- Coil Selection
-
 Various coil shapes: small circle, rectangle, combo coil (for railroad spikes)
 -
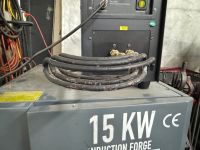 Taco coil – Taco shaped coil designed to fit odd shaped work pieces with easy access lengthways or by passing through the open back


Coil Sizing
- Select a coil that fits the workpiece closely without the workpiece touching the copper tubing.
- A coil that is much too large will transfer energy inefficiently.
- A coil that is too small may cause contact, arcing, overheating, or damage.
- Center the workpiece in the coil when possible.
- For localized heating, position only the area to be heated inside the coil.
- For longer workpieces, heat one section at a time and move the workpiece gradually.
- Do not force irregular work through a coil.
Number of Coil Wraps
For most general forging work, the useful range is usually 2 to 3 coil wraps.
- Two to three wraps are the common "sweet spot" for many applications.
- More wraps are not always better.
- Four or more wraps, especially on a large coil, may create too much resistance or place too much material mass in the field.
- If the machine errors, trips, or struggles with a large coil, use a more appropriate coil or reduce the heating demand.
Coil Fabrication
Only trained personnel should fabricate or install coils.
Simple coils can be made from 1/4 in. (6.35mm) diameter copper tubing using flared ends and 8 mm flare nuts for connection. An M14 nut is used for some coil mounting configurations. A 1/4" flare adapter is available from Cluaran Forge if needed.
Shop rules:
- Do not install homemade coils without approval.
- Do not use damaged, kinked, cracked, or poorly flared tubing.
- Do not use leaking fittings.
- Do not change coils unless trained and authorized.
- After any coil change, verify water flow and check for leaks before powering the forge.
Aftermarket Coils
Additional coil shapes and pre-made coils can be purchased from Cluaran Forge. He is a recommended vendor for custom and replacement induction coils.
The Taco coil is a specialized shape for heating specific workpiece geometries, such as the ends of bars or irregular shapes. It provides a more focused and efficient heat pattern than a standard round coil for certain tasks.
Changing Coils
Only trained users should change induction forge coils.
- Stop heating.
- Turn the power/amperage control to minimum.
- Turn off induction power.
- Allow the coil and fittings to cool.
- Keep the chiller running during cooldown.
- Confirm the machine is de-energized before disconnecting fittings.
- Remove and replace the coil carefully without bending, kinking, or cross-threading tubing/fittings.
- Restore water flow.
- Check for leaks.
- Restart only after confirming proper water circulation.
Control Interface
The induction forge can be operated in manual mode or automatic mode.
Manual Mode
Manual mode is the normal mode for forging.
- Heating occurs while the foot pedal is depressed.
- Releasing the foot pedal stops heating.
- Manual mode gives the operator direct control over heat timing.
- Use manual mode for most bending, forging, upsetting, and general heating operations.
Auto Mode
Auto mode allows programmed heating cycles.
Auto mode may include:
- Heating time
- Retention or hold time
- Cooling time
Auto mode is useful for repeatable processes, controlled heating cycles, or specialized operations, but it should be used only by trained operators who understand the settings.
Amperage / Power Control
- Use higher amperage for rapid forging heat on appropriately sized stock.
- Use lower amperage for heat treating, tempering, or larger stock that needs time for heat to soak inward.
- Lower amperage can help prevent overheating the surface before the core comes up to temperature.
- Do not automatically use maximum power.
- If the surface overheats, burns, sparks, or scales excessively, reduce amperage or stop heating.
Startup Procedure
Follow these steps in order. Water cooling must be running before the induction forge is powered for heating.
Pre-Start Check
- Verify that you are authorized to use the induction forge.
- Inspect the coil, water lines, fittings, power cable, plug, controls, and foot pedal.
- Confirm the cooling reservoir has adequate water/coolant.
- Turn on or verify operation of the chiller/pump.
- Confirm water circulation.
- Confirm there are no leaks.
- Select the correct coil for the workpiece.
- Confirm the workpiece fits inside the coil without touching it.
- Clear the coil area of tools, scrap, scale piles, rags, paper, solvents, and other flammable materials.
- Remove jewelry and loose metal items from your body and pockets.
- Put on required PPE.
Power On
- Turn on the cooling system, if it is not already running.
- Turn on the main power switch for the induction forge.
- Set the amperage/power control to minimum.
- Select manual mode unless a trained operator has set up an automatic cycle.
- Place the workpiece in or near the coil in the intended heating position.
- Press the foot pedal or start control to begin heating.
- Increase power gradually until the workpiece begins heating at the desired rate.
- Monitor the workpiece continuously.
Do not walk away while the forge is energized.
Operation
Workpiece Positioning
- Workpiece Placement
-
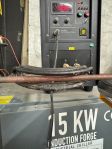 Correct: workpiece centered in the coil, not touching copper tubing
 -
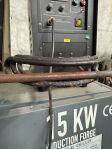 Incorrect: workpiece contacting the coil (arcing, damage, or equipment failure)


Heating the Workpiece
- Induction heating can bring small sections of steel to forging temperature very quickly.
- The exact heating time depends on:
- Workpiece diameter and mass
- Steel alloy
- Coil size and shape
- Number of coil wraps
- Distance between coil and workpiece
- Position of the workpiece in the coil
- Starting temperature
- Amperage setting
- Watch the workpiece color closely.
- Heat only as much material as needed for the operation.
- Move or rotate the workpiece as needed for even heating.
- Do not let the workpiece touch the coil.
- Do not allow the workpiece to become white hot.
- If the workpiece sparks, burns, or scales excessively, reduce power or stop heating.
- If the machine sounds abnormal, smells hot, leaks water, arcs, or behaves unexpectedly, stop immediately.
Approximate Steel Heat Colors
These color estimates are approximate and depend on ambient lighting.
- Dull red: approximately 1,100-1,300 °F
- Cherry red: approximately 1,400-1,600 °F
- Orange: approximately 1,700-1,900 °F
- Yellow: approximately 2,000-2,200 °F
- White or sparking: too hot for normal forging; stop heating immediately
Watch the video below to see a workpiece heated from room temperature to forging heat and finally to sparks (overheating):
Do not rely on color alone for critical heat treating. Use the appropriate heat-treating procedure, temperature measurement method, and material data for the steel being used.
Using the Foot Pedal
If the machine is in manual mode:
- Press the foot pedal to heat.
- Release the foot pedal to stop heating.
- Keep the power setting low until you understand the heating rate.
- Keep your stance stable.
- Do not trap the foot pedal under stock, tools, or debris.
- Do not bypass, tape down, or defeat the foot pedal.
Best Practices
- Use the smallest practical coil that safely fits the workpiece.
- Keep the workpiece centered in the coil.
- Use two to three coil wraps for most general work unless a specific coil design is needed.
- Heat incrementally rather than immediately using maximum power.
- Lower the amperage for large stock, heat treating, or tempering.
- For long stock, heat a short section, work it, then reheat as needed.
- For a piece larger than the coil opening, use a different forge or ask Makerspace leadership.
- Keep scale and debris out of the coil area.
- Allow the workpiece to soak briefly if the outside heats faster than the core.
- Use the gas forge instead when you need broad, even heat over a large area.
Shutdown and Cooldown
Follow these steps to shut down the forge safely.
- Stop heating by releasing the foot pedal or pressing the stop button.
- Turn the amperage/power adjustment to minimum.
- Turn off induction power.
- Leave the water cooling system running.
- Allow water to circulate for at least 5 minutes after heating stops, or longer if the machine, coil, or coolant is still warm.
- After the cooldown period, turn off the cooling system if required by shop procedure.
- Remove the workpiece only with tongs or appropriate handling tools.
- Leave hot work on a marked fire-safe surface.
- Clean the work area after everything is safe to handle.
Never turn off water cooling before the machine and coil have cooled. Residual heat can damage the coil and internal components.
Maintenance
Maintenance should be performed by trained personnel.
After Each Use
- Allow the machine to cool with water circulating.
- Inspect the coil for scale, debris, visible damage, looseness, or signs of arcing.
- Check the surrounding area for dropped hot scale or hot work.
- Wipe down exterior surfaces once cool.
- Report leaks, damaged fittings, abnormal sounds, weak heating, tripped breakers, or error messages to Makerspace leadership.
Weekly or Regular Shop Check
- Inspect water lines and fittings for leaks.
- Check the water level in the chiller/reservoir.
- Confirm that only approved water/coolant is used.
- Inspect the power cord and plug.
- Inspect the foot pedal.
- Check coils for damaged insulation, loose fittings, deformation, kinks, burn marks, or poor flares.
- Check for condensation around chilled lines or fittings.
Periodic Maintenance
- Replace or service cooling water according to manufacturer/shop schedule.
- Clean the reservoir/chiller as required.
- Inspect all coils and fittings.
- Confirm that the machine has adequate airflow and is not blocked by stored items.
- Verify that chiller settings are appropriate for shop conditions and dew point.
- Have electrical or coolant-system issues handled by qualified personnel.
Troubleshooting
Forge Does Not Start
- Confirm the main power switch is on.
- Confirm the machine is plugged into the correct outlet.
- Confirm the breaker has not tripped.
- Confirm the emergency stop is not engaged, if equipped.
- Confirm the cooling system is running.
- Confirm the foot pedal is connected, if required.
- Confirm the power setting is not at zero.
- Contact Makerspace leadership if the machine still does not start.
Workpiece Does Not Heat Quickly
- The coil may be too large for the workpiece.
- The workpiece may not be centered in the coil.
- The workpiece may be too far from the coil.
- The workpiece may be too large for the machine or coil.
- The power setting may be too low.
- The workpiece material may not couple efficiently.
- The cooling system or machine may have a fault.
- Wiring or power supply issues may be limiting performance.
Stop and contact Makerspace leadership if heating performance seems abnormal.
Machine Trips, Alarms, or Stops
- Stop heating.
- Turn the power control down.
- Check that the workpiece is not touching the coil.
- Check whether the coil is too large, has too many wraps, or is heating too much mass.
- Check for leaks or signs of arcing.
- Let the machine cool with water circulating.
- Do not repeatedly restart the machine without identifying the cause.
- Contact Makerspace leadership.
Overheating, Arcing, Sparks, or Burning Smell
- Stop heating immediately.
- Turn the power control to minimum.
- Turn off induction power.
- Keep water cooling running.
- Move hot work to a safe surface if it can be done safely.
- Contact Makerspace leadership.
Do not restart the machine until the problem has been inspected.
Water Leak
- Stop heating immediately.
- Turn off induction power.
- Keep clear of electrical components.
- Contact Makerspace leadership.
- Do not operate the machine until the leak is repaired and the area is dry.
Condensation or Sweating on Lines / Coil / Machine
- Stop operation.
- Keep the area clear.
- Contact Makerspace leadership.
- Do not adjust the chiller unless trained.
- Resume only after the chiller set point and shop conditions have been checked.
Machine Will Not Turn Off
- Release the foot pedal, if used.
- Press the stop button.
- Turn the power control to minimum.
- Use the emergency stop, if equipped.
- Turn off the main power switch.
- Contact Makerspace leadership immediately.
When to Use the Induction Forge
Use the induction forge when:
- You need fast heat on a specific area.
- The workpiece fits the available coil safely.
- You are bending, upsetting, drawing out, or locally forging small-to-medium stock.
- You want less open flame and faster setup than the gas forge.
- You are doing controlled, repeated heats on similar stock.
- You need to heat a section of stock rather than the entire piece.
Use another forge or contact Makerspace leadership when:
- The workpiece does not fit the coil.
- You need a long, even heat over a large section.
- The workpiece shape is irregular and may contact the coil.
- You are unsure which coil to use.
- You are unsure what amperage to use.
- You are heat treating a part that requires precise temperature control beyond visual color.
External Resources
- Coal Iron Works Induction Forge – Product Page
- Coal Iron Works Induction Forge Coils
- Cluaran Forge – recommended vendor for custom and replacement induction coils, including the Taco coil and 1/4" flare adapters
- Coal Iron Works Induction Forge Setup and Operation Video